In a previous blog, Getting off the Ground with Python and APIs, we took a glance at the power of Python and APIs when it comes to automating your network. In this blog, we are going to take our configuration to the next level with additional user inputs to automate deploying a new WLAN secured using WPA2-PSK. First, we will revisit our existing script and change how we gather our required information from the end user. Next, we will apply the changes we want on our controller. Finally, we will run a show command to confirm our changes were successful.
The equipment I am using for this post is a 7005 Mobility Controller in standalone mode running ArubaOS 8.6. You can find the full script and requirements on GitHub.
Since we are doing a bit more than just adding a VLAN to a mobility controller, I think it would be a fine choice to have our Python script ask us questions instead of expecting a user to remember a ton of different arguments to pass from the command line. If you were planning on doing a lot of these deployments, it might make sense to keep the args in this script. In our scenario where we are adding a single WLAN to a single controller, I thought it would be fun to show the different ways we can interact with our Python script.
First things first. Let’s import the libraries we need and set urllib3 to suppress error messages on mobility controllers without certificates installed.
- import requests
- import json
- import urllib3
- from getpass import getpass
- # Suppress error messages for controllers without SSL certificates
- disable_warnings(urllib3.exceptions.InsecureRequestWarning)
In this next step, we will ask our user to input the values needed by the script later on. In our previous blog, we used arguments passed from the command line. You’ll notice in this script we also verify the user enters the same controller password and pre-shared key (PSK) using the getpass library.
- # Collect user input for our script
- ip = input("Enter the IP Address of your Controller: ")
- username = input("Controller Username: ")
- password = None
- whilenot password:
- password = getpass('Controller Password: ')
- password_verify = getpass('Retype your password: ')
- if password != password_verify:
- print('Passwords do not match. Try again.')
- password = None
- ssid_name = input("New SSID Name: ")
- presharedkey = None
- whilenot presharedkey:
- presharedkey = getpass('Enter the PSK for this WLAN: ')
- presharedkey_verify = getpass('Retype your PSK: ')
- if presharedkey != presharedkey_verify:
- print('PSKs do not match. Try again.')
- presharedkey = None
- vlan = input("Assign to a VLAN: ")
In our next section we will log into the controller, using the previously provided IP address, username, and password. From here we are able to retrieve the UID we will use in our API calls and to set our cookie value that allows us access to the controller’s API. You’ll notice in later sections that we continually reference uid and cookies values.
- # Log into Aruba Controller and retrieve UIDARUBA for API access
- r = requests.get(url='https://'+ ip + ':4343/v1/api/login?username=' \
- + username +'&password='+ password, verify=False)
- logindata = r.json()
- uid = logindata['_global_result']['UIDARUBA']
- cookies = {'SESSION': uid}
- headers = {'content-type': 'application/json'}
- print("Our UID for this sessions is: "+ uid + '\n')
Next, we are taking the inputs that our user provided during the beginning of the script and applying the requested changes to our controllers.
In order we will:
- Create a new VLAN
- Build a AAA profile
- Build an Auth profile
- Build a SSID profile
- Build a Virtual AP
- Add the new SSID to the Default AP group
- Save the configuration to the controller
Note: When sending values such as true and false you need to use the Boolean value. For example, when configuring the opmode to wpa2-psk-aes you will need to enter bool(‘true’) instead of a string value that we use in other locations such as the profile names.
When this portion of the script runs you will receive the full JSON response from the controller. This can be changed by simply removing .text at the end of each print statement. The great part of keeping the full response is the ability to troubleshoot any problems that may have occurred. If you were to change a role in the AAA profile, for example, you may see an output similar to: "status_str": "Error: Role ‘example’ is user defined and can't be applied without Next Generation Policy Enforcement Firewall”.
- # Create a new VLAN
- print("\nCreating VLAN \n")
- newvlan = {'id': vlan}
- post_vlan_id = requests.post(url='https://'+ ip + \
- ":4343/v1/configuration/object/vlan_id?config_path=%2Fmm&UIDARUBA="+ uid, \
- data=json.dumps(newvlan), headers=headers, verify=False, cookies=cookies)
- print(post_vlan_id.text)
- # Build AAA Profile
- print("\nCreating Authentication Profiles \n")
- dot1x_prof = {
- "profile-name": ssid_name + "_auth_prof"
- }
- post_dot1x_prof = requests.post(url='https://'+ ip + \
- ":4343/v1/configuration/object/dot1x_auth_profile?config_path=%2Fmm&UIDARUBA="\
- + uid, data=json.dumps(dot1x_prof), headers=headers, verify=False, \
- cookies=cookies)
- print(post_dot1x_prof.text)
- aaa_prof = {
- "profile-name": ssid_name + "_aaa_prof",
- "default_user_role": {
- "role": "logon"
- },
- "dot1x_auth_profile": {
- "profile-name": ssid_name + "_auth_prof"
- },
- }
- post_aaa_prof = requests.post(url='https://'+ ip + \
- ":4343/v1/configuration/object/aaa_prof?config_path=%2Fmm&UIDARUBA="+ uid, \
- data=json.dumps(aaa_prof), headers=headers, verify=False, cookies=cookies)
- print(post_aaa_prof.text)
- # Build SSID profile
- print("\nCreating SSID Profile \n")
- ssid_prof = {
- "profile-name": ssid_name + "_ssid_prof",
- "ssid_enable": {
- "_present": bool('true'),
- "_flags": {
- "default": bool('true')
- }
- },
- "essid": {
- "essid": ssid_name
- },
- "wpa_passphrase": {
- "wpa-passphrase": presharedkey
- },
- "opmode": {
- "wpa2-psk-aes": bool('true'),
- },
- }
- post_ssid_prof = requests.post(url='https://'+ ip + \
- ":4343/v1/configuration/object/ssid_prof?config_path=%2Fmm&UIDARUBA="+ uid, \
- data=json.dumps(ssid_prof), headers=headers, verify=False, cookies=cookies)
- print(post_ssid_prof.text)
- # Build Virtual AP
- print("\nCreating Virtual AP \n")
- virtual_ap_prof = {
- "profile-name": ssid_name,
- "aaa_prof": {
- "profile-name": ssid_name + "_aaa_prof"
- },
- "vlan": {
- "vlan": vlan
- },
- "forward_mode": {
- "forward_mode": "tunnel"
- },
- "ssid_prof": {
- "profile-name": ssid_name + "_ssid_prof"
- }
- }
- post_virtual_ap_prof = requests.post(url='https://'+ ip + \
- ":4343/v1/configuration/object/virtual_ap?config_path=%2Fmm&UIDARUBA="+ uid, \
- data=json.dumps(virtual_ap_prof), headers=headers, verify=False, cookies=cookies)
- print(post_virtual_ap_prof.text)
- # Add to Default AP Group
- print("\nAdding new WLAN to Default AP Group \n")
- ap_group_prof = {
- "profile-name": "default",
- "virtual_ap": [
- {
- "profile-name": ssid_name
- }
- ]
- }
- headers = {'content-type': 'application/json'}
- post_ap_group_prof = requests.post(url='https://'+ ip + \
- ":4343/v1/configuration/object/ap_group?config_path=%2Fmm&UIDARUBA="+ uid, \
- data=json.dumps(ap_group_prof), headers=headers, verify=False, cookies=cookies)
- print(post_ap_group_prof.text)
- # Save the Configuration
- print("\nSaving Configuration \n")
- write_memory = requests.post(url='https://'+ ip + \
- ':4343/v1/configuration/object/write_memory?config_path=%2Fmm&UIDARUBA='+uid, \
- headers=headers, verify=False, cookies=cookies)
- print(write_memory.text)
I’ve omitted the output of this portion, because it is a couple pages worth of output. As I previously mentioned, use this output in your troubleshooting and verification process.
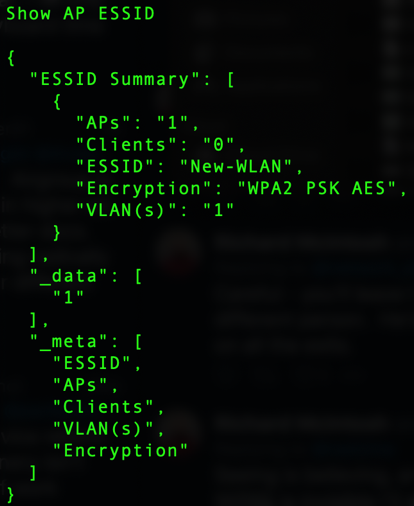
Finally, we verify that the script ran successfully, and our new WLAN has been created. From the output below you are able to determine that we created a WLAN called New-WLAN, it uses WPA2-PSK-AES encryption, and it uses VLAN 1 for data traffic.
- # Show the new WLAN
- print("\nShow AP ESSID\n")
- show_ap_essid = requests.get(url='https://'+ ip + \
- ':4343/v1/configuration/showcommand?json=1&command=show+ap+essid&UIDARUBA='\
- +uid, headers=headers, verify=False, cookies=cookies)
- print(show_ap_essid.text)
Congratulations! You have just created a WLAN from scratch using Python and the APIs on the Aruba Mobility Controller. What other tasks do you think you could automate? Join in on the Airheads Developer Community and see what others are doing in their environments. I also encourage you to check out Brian Gleason’s blog series about building a lab. He has a lot of information around building a lab that best suits you and your needs.
Read My Other Blogs
Getting off the Ground with Python and APIs
Cybersecurity in a Zero Trust Architecture