The first time you configure an Aruba controller, the process can feel overwhelming. Once you understand the structure and how the profiles are organized, it makes a lot more sense. In this article, I will share the configuration workflow I use. It will guide you if you are configuring a controller for the first time.
Profile Hierarchy
The configuration is organized around profiles. Each profile represents a set of configuration items. It allows the configuration to be modular and flexible if any changes need to be made.
These profiles can be related and linked to one another. Therefore, it is important to understand the hierarchy of these profiles and how they are linked with one another.
Here is a high-level view of the main profiles and how they are interconnected together. It is organized so you can use it as a reference if you need to prepare a simple configuration for 2 SSIDs:
- 1x 802.1X SSID for corporate use
- 1x open SSID with a captive portal for guest use
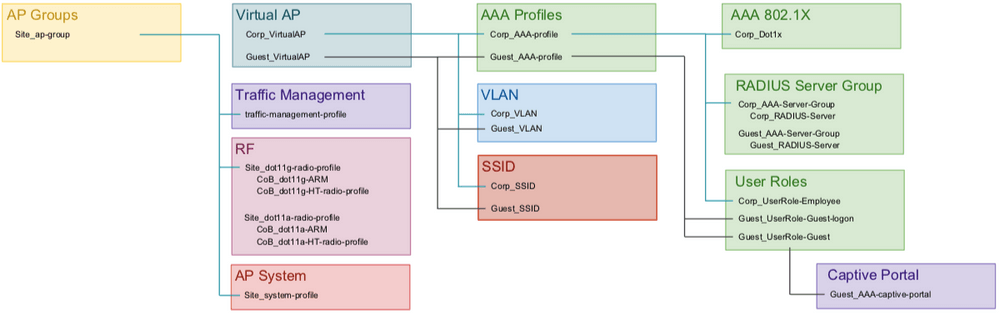
The “AP Group” profile is the head of the hierarchy. For a simple set of configurations, I group the APs by location. The profile regroups all the configuration for a particular set of access points. Therefore, it is the last one that we configure.
To have an efficient workflow, it is easier to start configuring the profiles located on the left of the diagram. This is because they don’t have any dependencies with other profiles. For example, we could start by configuring the “Captive Portal” or the “SSID” profiles.
Once we have configured the profiles without dependencies, we can start moving up the hierarchy until we reach the “AP Group” profile.
Everyone has their own preferences, but I find it very useful to keep the type of profile in the profile name itself. For example, if I want to configure an “AAA profile”, I would name it something like “Site_aaa-profile”. It allows me to quickly analyze the configurations and decrease the number of mistakes made when creating the dependencies. This is especially true if you like to use CLI to configure your controllers.
Building the Configuration
Once you have defined which profiles you need and choose their names, you are ready to prepare your configurations. You could do it yourself. It is actually a really good exercise if you want to learn or if you are studying for an Aruba certification.
An alternative is to use the online tool provided by Aruba called Aruba Solution Exchange: https://ase.arubanetworks.com/
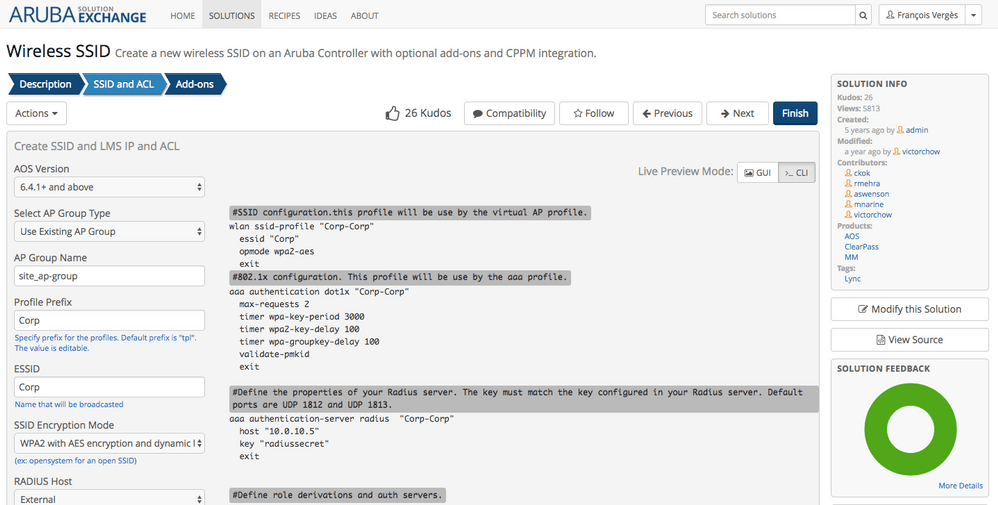
The tool can help you generate a set of configurations. Templates are available and can be modified so the profiles and their name match exactly what you need. You can use the template to build a simple set of configurations is called “Wireless SSID”.
At the end of the process, you can download the configuration. At this point, it is an excellent idea to review and adjust it if it doesn’t quite meet your needs.
Once you have your configuration ready, you can go ahead and apply it to your controller. I am a fan of the CLI, so I usually use the CLI to do so.
“All Profiles” Menu
The GUI can also be used to configure the different profiles. These profiles are organized by section and it is not always easy to find them. However, they are all grouped under the “Advanced Services/All Profiles” menu located at the bottom left of the Configuration Tab.
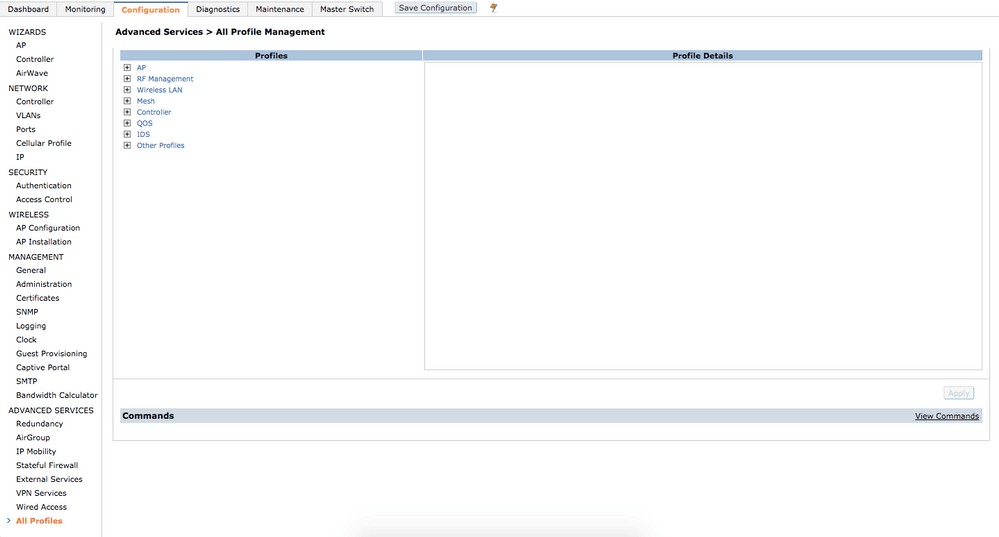
I find that it is easier to find the profiles there and I use it to validate the configurations I have applied via the CLI.
Resources
For more details on the profiles and on how to build more advanced configurations, feel free to consult these documents:
I hope that this article will help you if you are configuring an Aruba controller for the first time.
Follow Francois Verges on Twitter at @VergesFrancois.