It is now time for the conclusion of this trilogy.
Previously in "CPPM / Meridian integration":
- We saw that Meridian can easily integrate with ClearPass (using OAuth2) and loved it
- Then we discovered that ClearPass can share custom attributes with Meridian in order to display custom content (at least in the user details Meridian App page).
And that's exactly where I want to drive you: use ClearPass custom user attributes to display a specific page depending on who is connecting to the Meridian App. Here's how to do it.
First of all, we need to know which kind of info we want to show, thus which custom attributes to use. In my setup, I'd like to:
- First, create an agenda when I create a new guest user in ClearPass
- Associate this agenda to my new guest
- Display this agenda in the Meridian App when the guest is registered
Here is what we need:
- A web server (agenda for my setup) which will host the guest/agenda creation page and also the agenda display in the Meridian App
- A database (in my case MariaDB) to store agenda details and map agenda to guests
- And of course Meridian and ClearPass
For the database, I'll use the following structure:
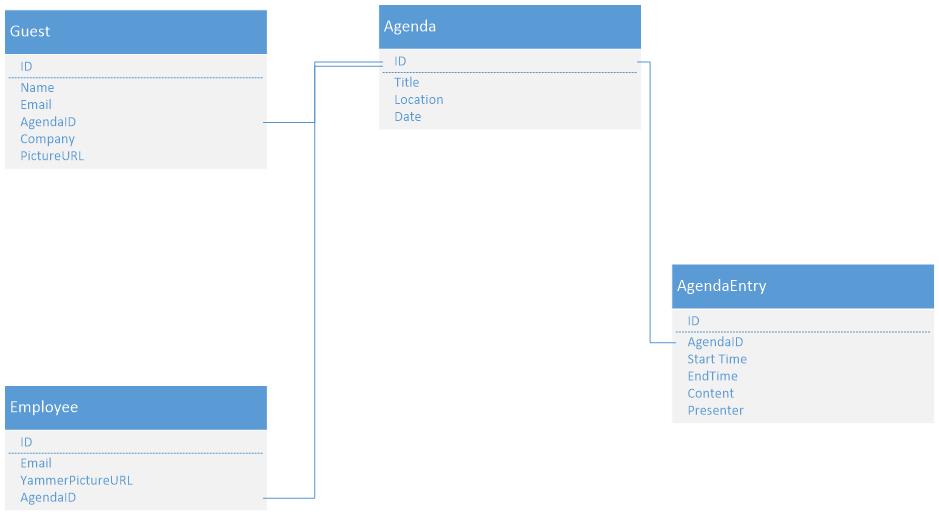
<-- Please note:
As you can see I also have a table called Employee. This is because, in my setup, I also want to associate to a list of guests/agenda some corporate users (such as Sales Account Manager) so that these corporate users can also access the same agenda as the guest they are responsible for. The interesting part is that for these employees I don't need to create a guest in ClearPass: I used AD authentication directly. And the funny part is that based on their email address, I added a Yammer API call to get their picture URL and display it on top of the Meridian App Web Page J
>
Now we have the structure let's first manage the guest / agenda creation.
Guest / agenda creation
For this, we'll use an Apache server and we'll code using HTML, Python and JavaScript. We'll also use Bootstrap library so that the page/fields / images etc resize automatically depending on the size of the Window / Device.
Don't worry, I won't copy/paste the entire code here, only main lines. But the entire project is accessible in GitHub here.
Let's describe the flow:
- First, we need to authenticate the users via ClearPass API (so that only local ClearPass users and Corporate AD users can manage accounts).
Below is the main portion of the Python authentication script (called from HTML / JS files):authURI = "/api/oauth" headers = {'Content-Type':'application/json'} d={'grant_type':'password','username':str(username),'password':str(password),'client_id':clientID}url = CPPMBaseURL + authURI # Request to authenticate the guest manager and receive corresponding token (mandatory to create guest) data = requests.post(url,headers=headers,data=json.dumps(d)).json() if "access_token" in data: return data['access_token'] return NoneSo at the end, we get a token we can use later to create CPPM guests.
- Then we create the agenda and agenda entries in the DB, based on the data we get from the HTML Form.
Again, here are the most interesting parts:MySQLQuery = 'INSERT INTO Agenda (Title,Location,Date,Logo) VALUES ("%s","%s",STR_TO_DATE("%s","%s"),"%s")' %(title,location,date,dateFormat,logo) MySQLQuery = 'INSERT INTO AgendaEntry (AgendaID,StartTime,Content,Presenter,Day) VALUES ("%s","%s","%s","%s","%s")' % (agendaID,data['begin'],data['content'],data['pres'],data['day'])
- After that, we create the guest users in ClearPass and in the DB (again using HTML Form Data); and we associate guest and agenda thanks to agenda ID field.
Guest creation in ClearPass:
headers={'Authorization':'Bearer ' + token ,'Content-Type':'application/json'} BaseURI ="/api/guest" # API request for guest creation apiResult = requests.post(url,headers=headers,data=json.dumps(data)).json()In the DB:
MySQLQuery = 'INSERT INTO Guest (Name,Email,AgendaID,PictureURL,Company) VALUES ("%s","%s","%d","%s","%s") ON DUPLICATE KEY UPDATE Name="%s", Agendasrc="%d", PictureURL="%s", Company="%s"' % (data['visitor_name'],data['email'],agendaID,data['visitor_picture'],data['visitor_company'],data['visitor_name'],agendaID,data['visitor_picture'],data['visitor_company'])
- Finally, we create employee users in the DB, get picture URL via Yammer API and put this all together in the DB.
Employee creation, with agenda info, in the DB:
MySQLQuery = 'INSERT INTO Employee (Email,AgendaID) VALUES ("%s","%d") ON DUPLICATE KEY UPDATE Agendasrc="%d"' % (employee,agendaID,agendaID)Get employee picture URL in Yammer info (update in DB code is similar as previous examples):
YammerBaseURL="https://www.yammer.com" auth_token="
" headers={'Authorization':'Bearer ' + auth_token} GetUserByEmailURI="/api/v1/users/by_email.json?email=" result = "" url = YammerBaseURL + GetUserByEmailURI + email userInfojson = requests.get(url,headers=headers).json() userPictureTemp = userInfojson[0]['mugshot_url_template']
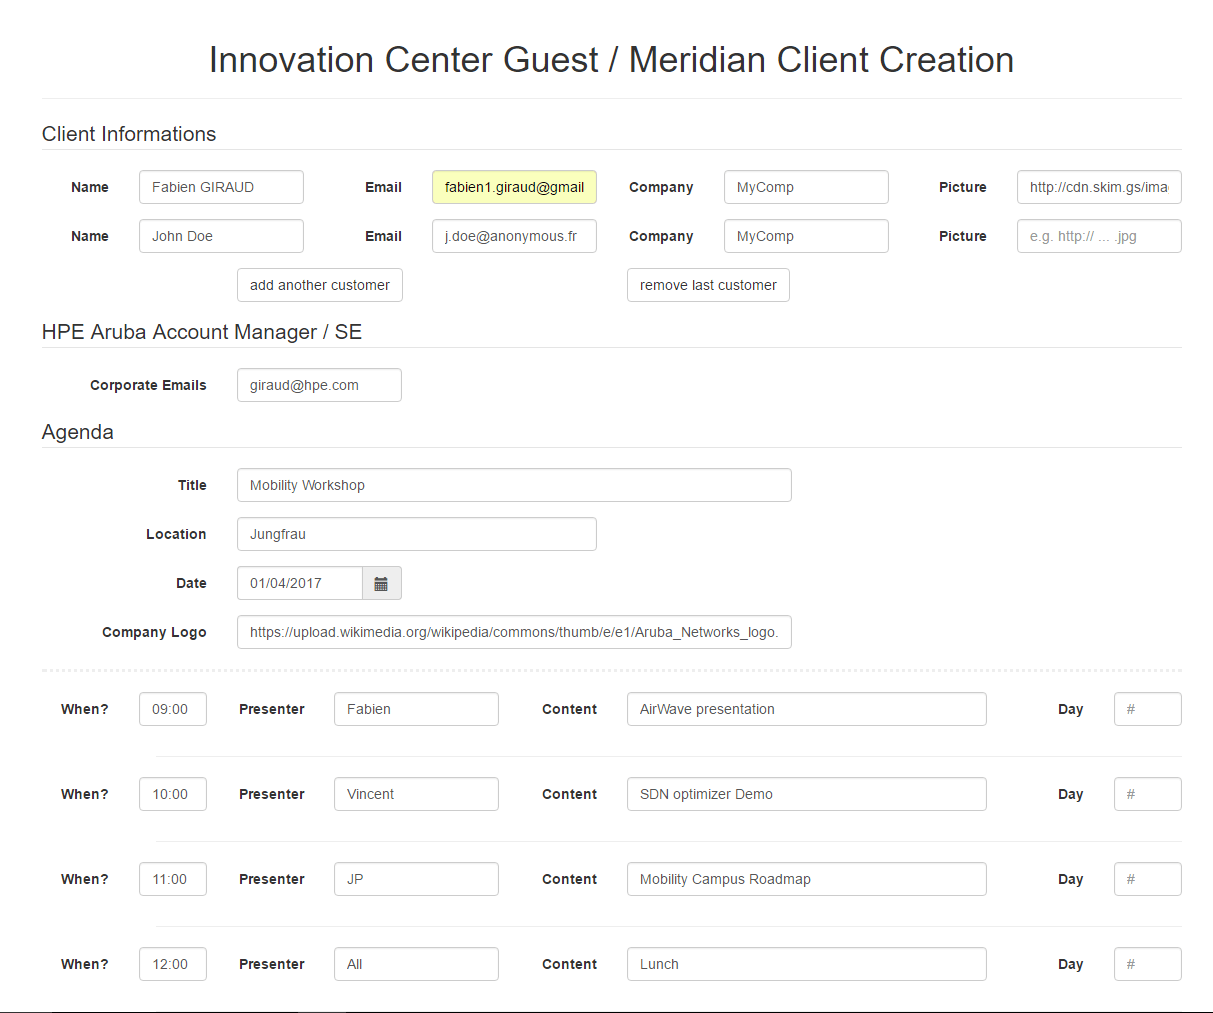
And here is the result (I know, I'm not a Web designer, so I tried to keep it as simple as possible ):
Authentication

Guests / Agenda form
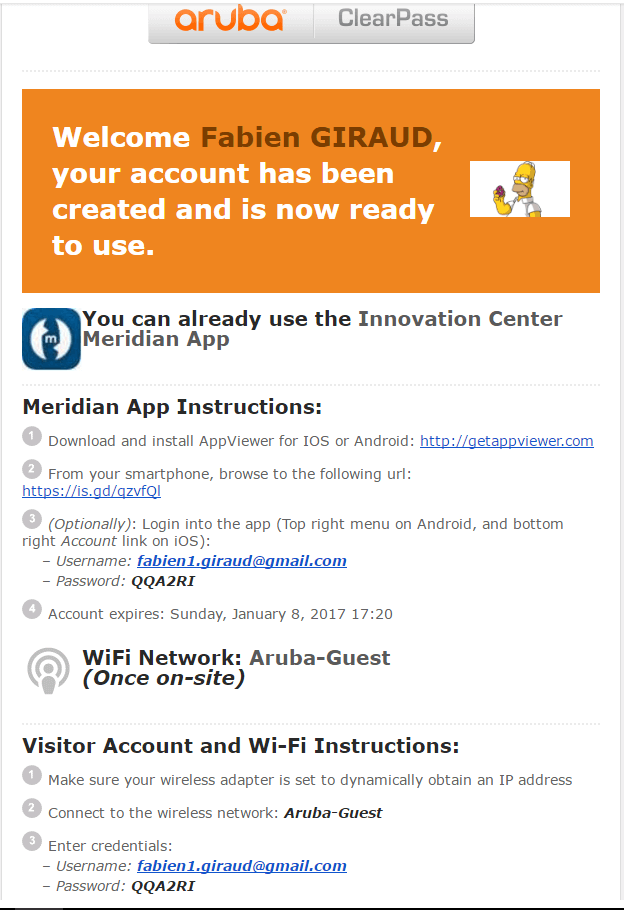
Email Receipt
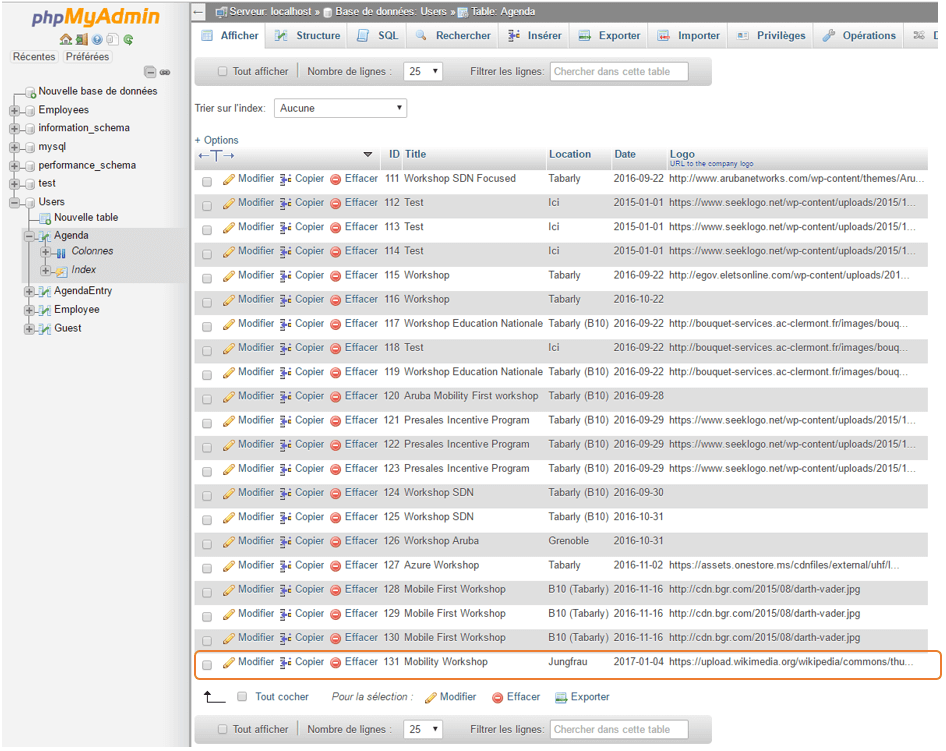
Agenda & Agenda Entries in DB
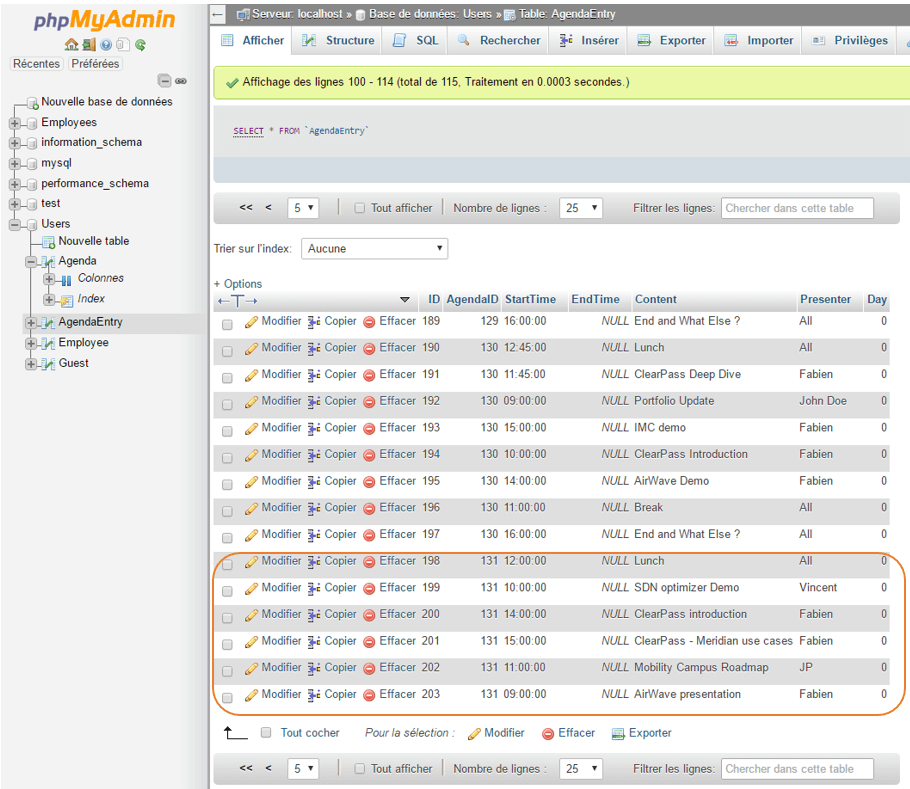
Employee entries in DB

Guest Entries in DB

And in ClearPass
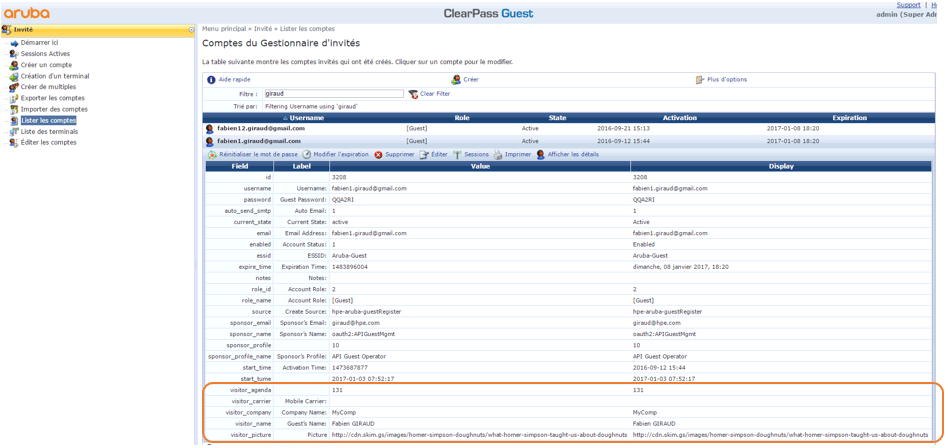
Meridian Setup
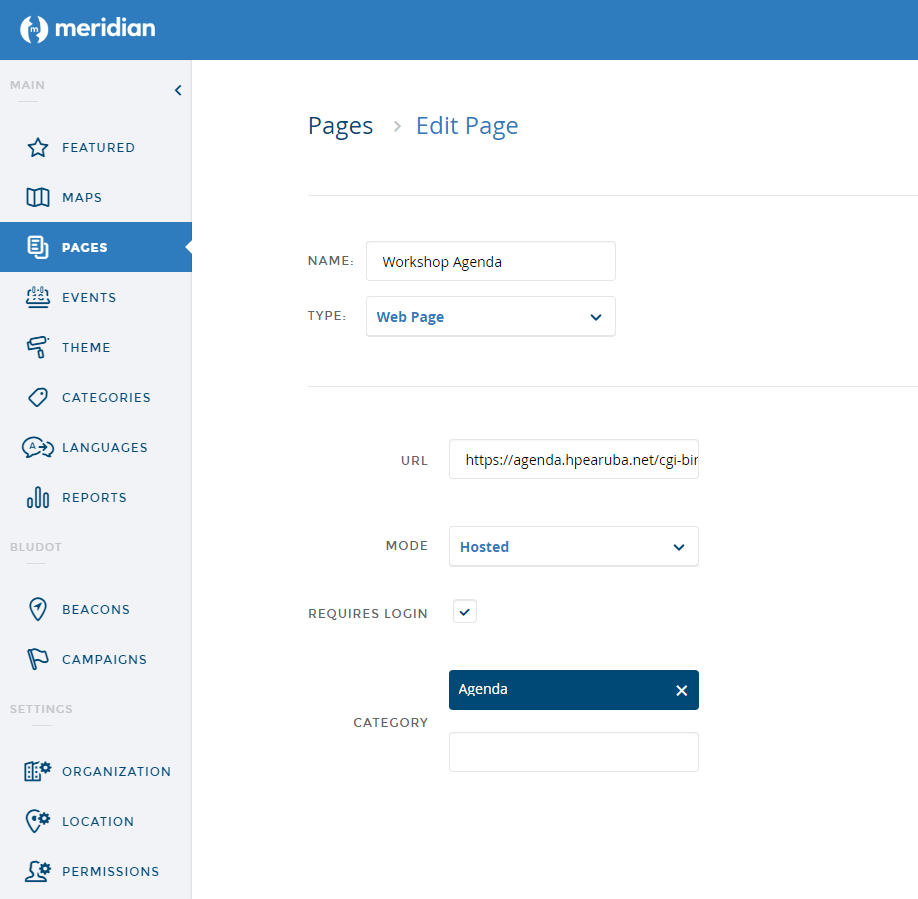
On the Meridian side, all we need to do is to add a new Web Page which will point to the agenda page display off our Web Server.
IMPORTANT: This page must be a "Hosted" Web Page, otherwise the token won't be sent in the header when accessing it from the app.
We also checked the "Requires Login" option in order to be sure the user is authenticated and so have a token.
Agenda Display Web Page
Now we need to create the web page we want to display when a Meridian user opens the agenda in the App.
To summarise, in this page we:
- Get the token sent in the header of the page from the Meridian App
- Based on this token, we get User additional parameters via ClearPass API (for more information on these additional parameters, see the second episode of this blog trilogy
- Build the web page based on these additional parameters and DataBase entries
Again if you want to see the entire code, please have a look on Github here.
Here are the main steps:
- Get the token:
import os token =re.sub('Bearer ','',os.environ['HTTP_AUTHORIZATION']) - Get ClearPass additional parameters:
meURI = "/api/oauth/me" headers={'Authorization':'Bearer ' + token ,'Content-Type':'application/json'} url = CPPMBaseURL + meURI # API URI call to get ClearPass user specific attribute based on the token parameter data = requests.post(url,headers=headers).json() - Build the web page based on ClearPass additional parameters and DataBase entries:
# Print the name of the user based on parameter got from CPPM print("""""" %(Title,Date,data['image'],data['badge'])) (full code on Github)Agenda for %s
""" %(data['name'])) dateFormat = '%m/%d/%Y' # SQL query to retrieve Agenda main info (based on User CPPM parameter : Agenda) agendaSQLQuery = 'select Title,Location,Logo,DATE_FORMAT(Date,'%s') from Agenda where ID = %s' %(dateFormat,data['agenda']) SQLResult = get_db_query(agendaSQLQuery) size = '100' # Displaying this in the html page for (Title,Location,Logo,Date) in SQLResult: if data['image']: print("""%s, Date: %s
Conclusion
Finally, at the end of this series, the flow can be summarised as the following graph:
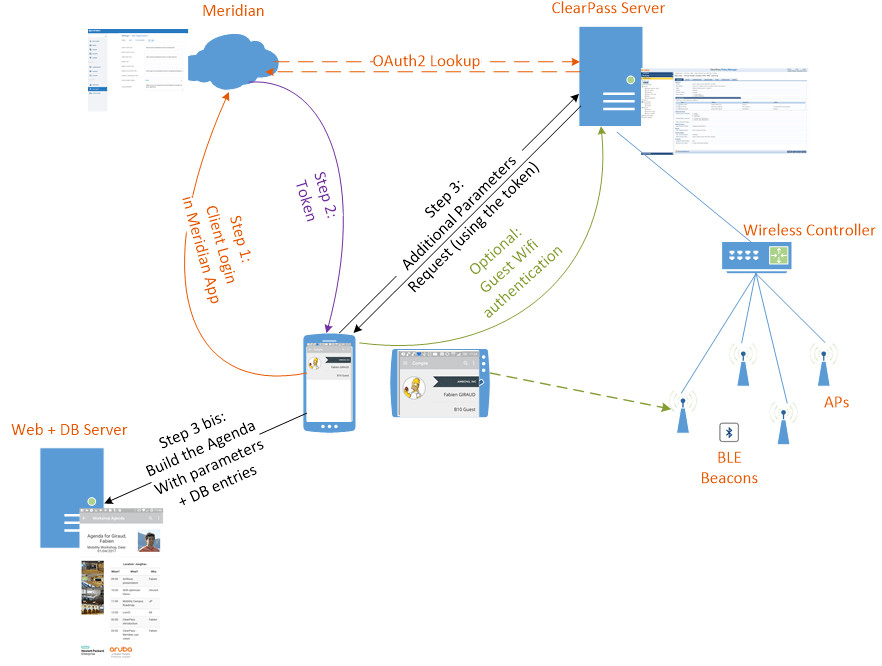
And the result, from a user experience point of view, is:
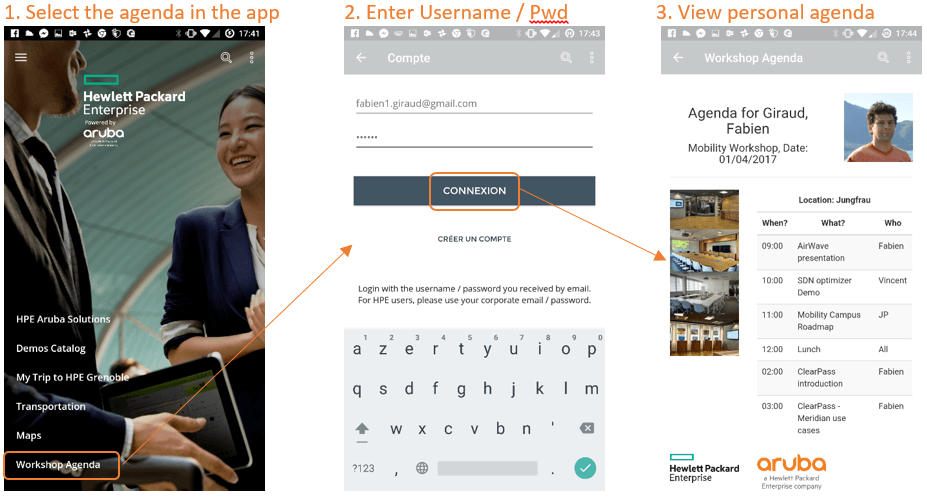
So we finally make it: we have a complete Meridian – ClearPass integration! Just to remind you, here is what we have:
- Authentication in Meridian App through ClearPass (Blog 1)
- Additional custom parameters in ClearPass we can use in the Meridian App (Blog 2)
- Custom web page in Meridian App which uses these additional parameters to deliver custom content (This Blog)
I hope you enjoy this entire trip and feel free to post some comments (with remarks or questions). You can now safely release your seat belt, we've reached our destination.


